Difference between revisions of "Introduction to the Zing Laser"
Jump to navigation
Jump to search
| Line 69: | Line 69: | ||
:Note that we have a Slack channel (#job-board) for members to post, discuss, or accept job opportunities either within PPM or from the community. | :Note that we have a Slack channel (#job-board) for members to post, discuss, or accept job opportunities either within PPM or from the community. | ||
{{Template:Footer}} | {{Template:Footer}} | ||
| − | |||
<p style="padding:0.2em 0.4em; background:#D81F2B; color:#FFFFFF; font-size:15%;"> </p> | <p style="padding:0.2em 0.4em; background:#D81F2B; color:#FFFFFF; font-size:15%;"> </p> | ||
[[Category:Historical]] | [[Category:Historical]] | ||
Revision as of 13:50, 8 December 2024
Safety
- To avoid the risk of fire, never leave the laser running unattended.
- Never run the Zing without the ventilation fans running. The interaction of the laser and the material generates fumes.
- The laser wavelength is such that the glass cover protects the eyes of the user. Do not attempt to run the laser with the cover open.
- PVC - Poly Vinyl Chloride. NEVER attempt to laser PVC or Vinyl.
- The laser release Chlorine gas which will irritate your eyes, your lungs, the eyes and lungs of anyone else around. The gas will also attack the finish on the laser optics.
Basic Concepts
- The Zing Laser cuts, engraves, and marks a variety of materials using a CO2 laser. The actual effect is dependent on the material, the laser power setting, the laser speed setting, and the laser resolution setting.
- The beam path originates from a laser generator on the bottom left of the machine and through mirrors, directed to the cutting head.
- The Zing interprets colors and lines into the appropriate laser marking/cutting sequence.
Modes of Operation
Raster
- Raster Images are made of pixels and will be engraved. Common examples would be photos or images.
- The cutter software will take your raster image and convert it into greyscale with each pixel being represented by a dot.
- The laser will pulse on and off as it follows these series of dots to create the image.
- The cutter achieves fine resolution by adjusting the power of the laser dependent on the darkness/lightness of the dot.
Vector
- Vector images are made of points and lines that connect points.
- The laser will use your vector drawing as a path to follow.
- This method of use is great for cutting out shapes from thin material.
- Vector lines must be set to 0.001 pt in Adobe Illustrator (0.025 mm / 0.001 inches in Inkscape).
Basic Controls
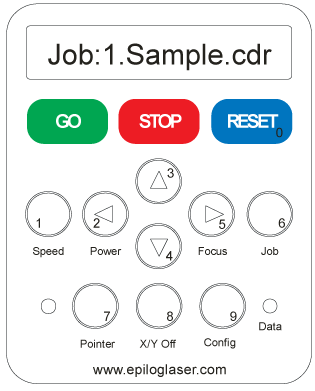
The Keypad
- To start processing a job, press GO
- To stop the Zing press STOP
- To reset the Zing press RESET (laser turns off, head drives back to starting point)
- To toggle pointer on/off press 7 - Pointer button
- To manually set origin:
- Press 8 - X/Y Off button (this will disconnect the mechanical linkage between the gantry and the stepper motors allowing you to manually move the gantry)
- Open cover
- Move head to the desired position (BEWARE the optics)
- Close cover
- Press GO
- Press RESET
Steps for Operation
Turn On
- Turn on the fan
- Turn on the air assist
- Load your material
- Use the controls to focus the laser head over the material
Turn Off
- Before turning off the exhaust fan switch you must make sure the Boss is not running because it uses the same exhaust fan
- Clean and organize your area when your work is complete
Related Pages
Links to related PPM Wiki pages:
For Additional Help
- Use the PPM Slack channel #laser-cutter
- List of all PPM Slack channels
- Note that we have a Slack channel (#job-board) for members to post, discuss, or accept job opportunities either within PPM or from the community.
Search the PPM Wiki — include Content pages as well as Multimedia.
Contact Us if you cannot find your answer here on our Wiki or if you notice any information that is outdated.
