Sandblasting Cabinet: Difference between revisions
Jump to navigation
Jump to search
No edit summary |
No edit summary |
||
| Line 1: | Line 1: | ||
Pikes Peak Makerspace ( | [[File:Level_2_badge.png|alt=|left|frameless|100x100px]] | ||
'''The Powder Coating Area within our Metal Shop at Pikes Peak Makerspace consists mostly of Level 2 equipment.''' | |||
Additional training is required to use our Level 2 equipment. | |||
<span style="color:#FFFFFF; background:#EB4F9C"> Metal Shop Area </span> hand tools should be marked with <span style="color:#EB4F9C">'''pink'''</span> tape or paint. | |||
All our [[Powder Coating Area#Equipment Lists|Powder Coating Equipment]] combined occupies about 90 square feet (6'x18'). It is a small but important part of our 5,500 square foot facility. | |||
<br> | <br> | ||
<br> | <br> | ||
{{Template:Safety}} | {{Template:Safety}} | ||
===Sandblasting Safety === | ===Sandblasting Safety=== | ||
*Wear respirator | *Wear respirator | ||
* Wear eye protection | *Wear eye protection | ||
*Do not use sandblaster with the door open | *Do not use sandblaster with the door open | ||
*Using abrasive media with silica without a really good respirator will damage lungs | *Using abrasive media with silica without a really good respirator will damage lungs | ||
==Sandblasting == | ==Sandblasting== | ||
===Part prep=== | ===Part prep=== | ||
*Clean all dirt and grease and oil off parts before blasting | *Clean all dirt and grease and oil off parts before blasting | ||
* Use tape to cover any part that you don’t want to be blasted | *Use tape to cover any part that you don’t want to be blasted | ||
* Use plugs or bolts to cover holes where you don’t want media to enter | *Use plugs or bolts to cover holes where you don’t want media to enter | ||
===Blast cabinet Prep=== | ===Blast cabinet Prep=== | ||
| Line 23: | Line 32: | ||
*Set correct psi for the abrasive media loaded | *Set correct psi for the abrasive media loaded | ||
=== Changing out abrasive media=== | ===Changing out abrasive media=== | ||
* Place container under cabinet and open bottom door | *Place container under cabinet and open bottom door | ||
*Brush off any media left inside on the sides into the container | *Brush off any media left inside on the sides into the container | ||
* Vacuum any media left | *Vacuum any media left | ||
*Empty cyclone and vacuum and blow out the filter | *Empty cyclone and vacuum and blow out the filter | ||
*Store abrasive media in an airtight container or throw away if no longer good | * Store abrasive media in an airtight container or throw away if no longer good | ||
* Close bottom door and poor new media into cabinet through side door, 50lb max | *Close bottom door and poor new media into cabinet through side door, 50lb max | ||
*Media must be dry | *Media must be dry | ||
*Put abrasive media tag on cabinet | *Put abrasive media tag on cabinet | ||
| Line 36: | Line 45: | ||
===Sandblasting=== | ===Sandblasting=== | ||
*Place prepped part into the prepped cabinet and close and latch door | * Place prepped part into the prepped cabinet and close and latch door | ||
*Flip on the power switch to turn on lights and vacuum | *Flip on the power switch to turn on lights and vacuum | ||
*Use steady side to side movement when blasting | *Use steady side to side movement when blasting | ||
* DO NOT stop and blast in one concentrated area for any long period of time as it can warp thinner panels and remove too much material on some surfaces | *DO NOT stop and blast in one concentrated area for any long period of time as it can warp thinner panels and remove too much material on some surfaces | ||
* keep your nozzle at a 60-45 degree angle and aimed in the direction you are moving when blasting | *keep your nozzle at a 60-45 degree angle and aimed in the direction you are moving when blasting | ||
*If blasting gun sticks on turn off the air and remove the nut on top of the gun, remove the pin and blow out, and reassemble | *If blasting gun sticks on turn off the air and remove the nut on top of the gun, remove the pin and blow out, and reassemble | ||
*Blow off the part with air before removing it from the cabinet | * Blow off the part with air before removing it from the cabinet | ||
=== Abrasive Media=== | ===Abrasive Media=== | ||
*Media has a life span | *Media has a life span | ||
*Some are single-use and some can be reused many times | *Some are single-use and some can be reused many times | ||
* Using the right media for the part and correct PSI can extend the lifespan of media | *Using the right media for the part and correct PSI can extend the lifespan of media | ||
*Used media is like used sandpaper and loses effectiveness the more that it is used | *Used media is like used sandpaper and loses effectiveness the more that it is used | ||
*If blasting is starting to take longer it is time to replace media | *If blasting is starting to take longer it is time to replace media | ||
Revision as of 22:17, 11 January 2022

The Powder Coating Area within our Metal Shop at Pikes Peak Makerspace consists mostly of Level 2 equipment.
Additional training is required to use our Level 2 equipment.
Metal Shop Area hand tools should be marked with pink tape or paint.
All our Powder Coating Equipment combined occupies about 90 square feet (6'x18'). It is a small but important part of our 5,500 square foot facility.
Safety First
Members must know the following information:
- In case of emergency, call 911.
- Our physical location is:
- 735 East Pikes Peak Avenue
- Colorado Springs, CO 80903
-
 IN CASE OF
EMERGENCY
sign

PPM Fire Escape Plan
- Fire Escape Plan maps are posted throughout the Makerspace.
- There are 7 fire extinguishers on the fire escape plan map.
- Review the PPM Fire Escape Plan for locations.
-
 PPM Emergency
Evacuation Plan.pdf -
 PPM Fire
Prevention Plan.pdf -
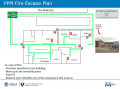 PPM Fire Escape
Plan

First Aid
- There is a FIRST AID Supply Cabinet in our Kitchen Area.
- FIRST AID Kits are available in four areas: the Kitchen, Metal Shop, Wood Shop and CNC Room.
-
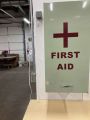 FIRST AID
Supply Cabinet -
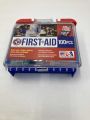 FIRST AID
Kit


Eye Wash Stations
- Emergency Eye & Face Wash Stations are mounted in four areas: the Kitchen, Wood Shop, CNC Room and Vented Room.
-
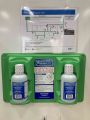 Emergency
Eye & Face Wash
Station

Personal Protective Equipment (PPE)
- Wear protective equipment in all Wood and Metal Shop Areas.
- Wear gloves when using Isopropyl Alcohol and other cleaners.
- Gloves should not be worn when using powered equipment (saws, jointers, drills, or other equipment). Leather gloves can be worn for handling materials, but not when operating machinery.
-
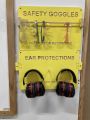 Personal Protective Equipment (PPE)

Hazardous Chemicals
- All hazardous chemicals must be stored in the yellow hazardous chemical storage cabinet located in the Vented Room.
- Review the Safety Data Sheet (SDS) information of unknown products before use.
- SDS information is available via this spreadsheet.
- Do not bring dangerous chemicals to the makerspace.
- Spray paint, stains, and other approved items must be stored in the hazardous chemical storage cabinet in the Vented Room.
- Please DO NOT paint indoors.
-
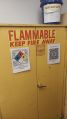 Flammables Cabinet
in the Vented Room

Other Hazards
- Avoid placing uncovered (extension) cords, hoses, cables, or wires across the floors of our shops.
Impairment
- The use of PPM equipment requires you to be alert, attentive, and focused.
- Do not use any PPM work area, or any PPM tools, if you are under the influence of drugs or alcohol.
Sandblasting Safety
- Wear respirator
- Wear eye protection
- Do not use sandblaster with the door open
- Using abrasive media with silica without a really good respirator will damage lungs
Sandblasting
Part prep
- Clean all dirt and grease and oil off parts before blasting
- Use tape to cover any part that you don’t want to be blasted
- Use plugs or bolts to cover holes where you don’t want media to enter
Blast cabinet Prep
- Check vacuum filter and cyclone before use and empty and clean if needed
- Load abrasive media needed for the job
- Set correct psi for the abrasive media loaded
Changing out abrasive media
- Place container under cabinet and open bottom door
- Brush off any media left inside on the sides into the container
- Vacuum any media left
- Empty cyclone and vacuum and blow out the filter
- Store abrasive media in an airtight container or throw away if no longer good
- Close bottom door and poor new media into cabinet through side door, 50lb max
- Media must be dry
- Put abrasive media tag on cabinet
Sandblasting
- Place prepped part into the prepped cabinet and close and latch door
- Flip on the power switch to turn on lights and vacuum
- Use steady side to side movement when blasting
- DO NOT stop and blast in one concentrated area for any long period of time as it can warp thinner panels and remove too much material on some surfaces
- keep your nozzle at a 60-45 degree angle and aimed in the direction you are moving when blasting
- If blasting gun sticks on turn off the air and remove the nut on top of the gun, remove the pin and blow out, and reassemble
- Blow off the part with air before removing it from the cabinet
Abrasive Media
- Media has a life span
- Some are single-use and some can be reused many times
- Using the right media for the part and correct PSI can extend the lifespan of media
- Used media is like used sandpaper and loses effectiveness the more that it is used
- If blasting is starting to take longer it is time to replace media
- Harder and round media last longer
- Round media gives a smoother finish
Application
Remove rust and paint
| Media | Description | Used For | Hardness | Shape | PSI | Average Recycle uses |
|---|---|---|---|---|---|---|
Soda |
Soda abrasive is from baking soda or bicarbonate of soda. It offers non-destructive cleaning and very popularly usedoperators. | It is used to remove rust from metals without causing depression or damaging the metal beneath the rough surface. | 2.5 | Angler | 70PSI | Single-use |
Coal Slag / Aluminum Silicate |
It is a dispensable abrasive which is a by-product of coal-fired electric power generation plants. It has less dust compared to Copper Slag. | It is often used in open blasting operations in the oil- and shipyard industry and other metal surface treatments. | 6-7 | Angler | 50 PSI | 2-3 times |
Aluminum Oxide Grit |
An extremely sharp, long-lasting blasting abrasive that can be recycled many times. It is available in 99.5% pure white grade and commonly standard brown. | It is often used in open blasting operations in the oil- and shipyard industry and other metal surface treatments. | 6-7 | Angular | 90PSI | 50 times |
Crushed Glass Grit |
Crushed Glass Grit is 100% recycled glass beads and are considered to be eco and health- friendly as it eliminates the presence of airborne carcinogens. It is non-toxic and non-hazardous. | This is used in profiling and removal of coatings and surface contamination and can be used around water. | 5-6 | Angular | 80PSI | 15 times |
Steel grit |
Softer than Aluminum Oxide Grit but still have a very high hardness quality. It has a very fast stripping action and shot peening applications. | It is commonly used in cleaning, etching and surface preparations. | 8-9 | Angler | 100PSI | 100 times |
Staurolite |
It is a Silicate of Silica and Iron and is generally used to remove thin coatings, rust, and mill scale. Its sub-angular shape is ideal for applications where a minimal surface profile is required. | Perfectly used in stripping off surfaces in storage tank & tower construction, structural & plate steel blasting, and steel fabrication. | 7.0 Mohs | Sub-angular |
Application
Polish and paint prep
| Media | Description | Used For | Hardness | Shape | PSI | Average Recycle uses |
|---|---|---|---|---|---|---|
Glass Bead |
Glass Beads are manufactured into preformed ball shapes which is very effective in leaving very smooth surfaces. It produces super smooth and brighter finish compared to angular. | Commonly used for automotive restoration, stainless steel fabrication, polishing of castings and light deburring of metal molds and parts. | 6 | Round | 80PSI | 30 times |
Steel shot |
Steel Shot is manufactured into spherical pellet-type abrasive made from carbon steel. It often produces a very smooth surface after use. | Steel shot abrasive is often used in cleaning and polishing metal surfaces and parts in automotive, aerospace, construction, foundry, shipbuilding, rail, and more. | 40-51 HRC | Spherical | 130PSI | 100 times |
| Steel Grit |
Softer than Aluminum Oxide Grit but still have a very high hardness quality. It has a very fast stripping action and shot peening applications. | It is commonly used in cleaning, etching and surface preparations. | 40-65 HR | Angular | ||
Corn cob grit |
Corn Cob Grit is an organic, soft and natural abrasive from hard cob. It is tumbling and absorbent that dries surfaces. Corn cob grit is non-toxic and safe for operators. | It is best used on wood surfaces and does not create any damage on the treated surface. It is used in oily and moist surfaces that quickly absorbs it while finishing rough parts. | 4-4.5 | Ground, Angular shape | ||
Walnut shell grit |
It is a very versatile soft abrasive, organic and biodegradable. Same as corn cob, it is non-toxic and impose no hazard on health. | It is best used on wood surfaces and does not create any damage on the treated surface. It is used in oily and moist surfaces that quickly absorbs it while finishing rough parts. | 4.5-5 | Angler | 70 PSI | 4-5 times |
Copper Slag / Iron Silicate |
In contrast to its name, it contains almost no copper. It is refered to as the best abrasive to use when ranked on cutting speed and cost per sq. ft. | It comes in extra fine grade abrasive that is used for surface blast-cleaning carpets, plastic and wood. | 7 | Angular | 50 PSI | 2-3 times |
Garnet |
Garnet is a natural silicate mineral deposit. It has a high stripping rate, very low dust and the lowest consumption rate. | Mainly used for wet or dry sandblasting and offers an excellent coating preparation and adhesion properties. | 6.5 - 7.5 | Angular to Subangul | 60PSI | 4-5 times |
Plastic Urea |
Environmentally friendly and recyclable plastic high strip rate for sensitive parts. | used for applications such as auto and aircraft restoration to deliver an efficient strip rate without damage or warping of the substrate. | 3.5 | Angular | 70PSI | 4-5 times |