Shared Tools and Map: Difference between revisions
Jump to navigation
Jump to search
No edit summary |
|||
| Line 4: | Line 4: | ||
<hr style="height:2.5px; background:#ff6c00;"> | <hr style="height:2.5px; background:#ff6c00;"> | ||
<br> | <br> | ||
:[[File:Tool_Color_Map.jpg|alt=Tool Color Map|660x660px|right|frameless| | :[[File:Tool_Color_Map.jpg|alt=Tool Color Map|660x660px|right|frameless|Map]] | ||
==='''Back of shop (South part of building)'''=== | ==='''Back of shop (South part of building)'''=== | ||
Revision as of 16:22, 24 July 2026
Learn about our shared tools at Pikes Peak Makerspace (PPM).
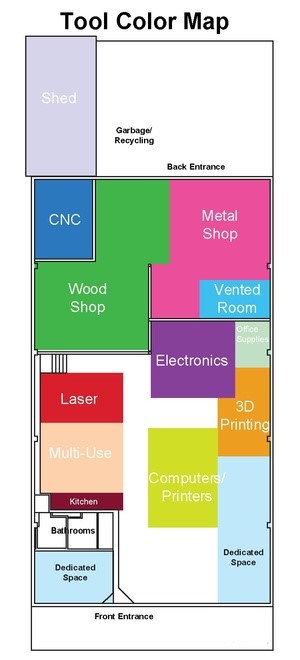
Map

Back of shop (South part of building)
Front of shop (North part of building)
- Laser — THUNDER
- Laser — BOSS
- Laser — Epilog Zing
PPM Equipment Levels
Shared equipment at our makerspace is categorized into three levels (1-3),
by amount of PPM training required:
- Level 1 - No training required.
PPM shared equipment that is immediately available to use by all paid PPM Members.

- Level 2 - Training required.
Equipment *buy-in* (usually just one PPM class, with a small additional fee).

- Level 3 - PPM certification required.
Under supervision of a PPM Captain, or by taking a PPM certification course.

Additional Help
Search the PPM Wiki — include Content pages as well as Multimedia.
Contact Us if you cannot find your answer here on our Wiki or if you notice any outdated information.