Wood Shop: Difference between revisions
| (90 intermediate revisions by the same user not shown) | |||
| Line 1: | Line 1: | ||
All Wood Shop users are required to follow all Wood Shop Policies and Safety Procedures. | |||
''' | '''Links to related PPM Wiki pages:''' | ||
:[[Wood Shop — SawStop table saw|<span style="color:#FFFFFF; background:#3DA942"> '''Wood Shop — SawStop table saw''' </span>]] | |||
:[[Wood Shop — Festool power tools|<span style="color:#FFFFFF; background:#3DA942"> '''Wood Shop — Festool power tools''' </span>]] | |||
<br> | |||
[[File:Level 3 badge.png|alt=Level 3 badge used at Pikes Peak Makerspace|left|frameless|90x90px|PPM TRAINING & CERTIFICATION REQUIRED]] | |||
'''both Level 2 and Level 3 equipment.''' | '''The Wood Shop Area at Pikes Peak Makerspace (PPM) consists of''' '''both Level 2 and Level 3 equipment.''' | ||
Additional PPM training and then PPM certification is required to use any of our Level 3 equipment. | Additional PPM training and then PPM certification is required to use any of our Level 3 equipment. | ||
| Line 9: | Line 15: | ||
Our trainers are passionate about sharing their knowledge and ensuring a positive learning experience for all. | Our trainers are passionate about sharing their knowledge and ensuring a positive learning experience for all. | ||
We are grateful for their commitment and dedication to our community. | We are grateful for their commitment and dedication to our community.<br> | ||
<br> | |||
<br> | <br> | ||
{{Template:Contact Us}} | {{Template:Contact Us}} | ||
< | <hr style="height:2.5px; background:#3DA942;"> | ||
<br> | <br> | ||
===Wood Shop Policy, Safety, and Orientation=== | ===Wood Shop Policy, Safety, and Orientation=== | ||
| Line 39: | Line 41: | ||
*'''Safety Glasses''' - Safety glasses are required when you are operating hand or stationary powered tools in the Wood Shop. | *'''Safety Glasses''' - Safety glasses are required when you are operating hand or stationary powered tools in the Wood Shop. | ||
**'''Additionally, safety glasses are required if you are in the Wood Shop, and someone else is operating powered tools.''' (ANSI Z87.1-impact resistant) safety glasses are required. These are rated for impact protection and have side shields to provide protection from objects coming from the front and sides. Most prescription glasses are not impact resistant or provide side protection. If you use prescription glasses, then put an ANSI Z87-1 goggle over them. | **'''Additionally, safety glasses are required if you are in the Wood Shop, and someone else is operating powered tools.''' (ANSI Z87.1-impact resistant) safety glasses are required. These are rated for impact protection and have side shields to provide protection from objects coming from the front and sides. Most prescription glasses are not impact resistant or provide side protection. If you use prescription glasses, then put an ANSI Z87-1 goggle over them. | ||
*'''Hearing Protection''' - Hearing protection is required when you are operating stationary powered tools, or someone else is operating machinery in the Wood Shop. There are two types of hearing protection | *'''Hearing Protection''' - Hearing protection is required when you are operating stationary powered tools, or someone else is operating machinery in the Wood Shop. | ||
**Soft | **'''There are two types of hearing protection available at PPM:''' | ||
**Ear muffs | **'''Soft foam earplugs.''' To get the best protection roll the foam with your fingers to condense the plug. Pull the top of your ear up and back with the opposite hand, and insert the plug into your ear canal. Hold the plug with your finger for 20-30 seconds to let the plug expand and fill your ear canal. Your voice will sound muffled if the plug has a good seal. | ||
**'''Ear muffs'''. These fit over both ears and have sound attenuating material and soft ear cushion to fit around the ears. | |||
*'''Respiratory Protection''' - Particulate filter respirator should be used when significant wood dust is being generated (when emptying the dust collector). | *'''Respiratory Protection''' - Particulate filter respirator should be used when significant wood dust is being generated (when emptying the dust collector). | ||
*'''Shoes''' - Closed toe shoes are required. If working with heavy lumber, consider safety shoes (steel or composite) to protect your toes if materials or tools are dropped. | *'''Shoes''' - Closed toe shoes are required. If working with heavy lumber, consider safety shoes (steel or composite) to protect your toes if materials or tools are dropped. | ||
| Line 52: | Line 55: | ||
*'''Wood Dust''' - Exposure to wood dust has been associated with a variety of adverse health effects including dermatitis, respiratory effects and cancers. Engineering controls include local exhaust ventilation which removes dust at or near the source. To be effective the dust collection system needs to be maintained. Check and clean the dust collection system to ensure they are working properly. Additionally, particulate filters, or respirators can be worn to protect personnel directly. | *'''Wood Dust''' - Exposure to wood dust has been associated with a variety of adverse health effects including dermatitis, respiratory effects and cancers. Engineering controls include local exhaust ventilation which removes dust at or near the source. To be effective the dust collection system needs to be maintained. Check and clean the dust collection system to ensure they are working properly. Additionally, particulate filters, or respirators can be worn to protect personnel directly. | ||
*'''Noise''' - The machinery in the Wood Shop can exceed 85 decibels in noise. This can impair hearing if you are exposed to it over a sustained amount of time. Noise levels can be reduced by maintaining motors and moving parts in top operating conditions, reducing the speed of operation, ensuring the equipment frames are rigid and isolating noisy equipment on rubber footing. Additionally, hearing protection (ear muffs, and ear plugs) can be used to reduce individual exposure to loud noises while working in this area. | *'''Noise''' - The machinery in the Wood Shop can exceed 85 decibels in noise. This can impair hearing if you are exposed to it over a sustained amount of time. Noise levels can be reduced by maintaining motors and moving parts in top operating conditions, reducing the speed of operation, ensuring the equipment frames are rigid and isolating noisy equipment on rubber footing. Additionally, hearing protection (ear muffs, and ear plugs) can be used to reduce individual exposure to loud noises while working in this area. | ||
*'''Electrical Hazards''' - To minimize the danger of electrical hazards, machines must always be grounded, circuit breakers and fuse boxes labeled, cords, cables and plugs must be in good repair, and outlets and switches must be covered. Report any unsafe condition found by using posting on #red- | *'''Electrical Hazards''' - To minimize the danger of electrical hazards, machines must always be grounded, circuit breakers and fuse boxes labeled, cords, cables and plugs must be in good repair, and outlets and switches must be covered. Report any unsafe condition found by using posting on #red-tag-issues on Slack and putting a filled out red-tag on the equipment to prevent its use until it is repaired. | ||
*'''Machine Maintenance''' - Equipment needs to be properly maintained to function safely. If there is any indication that the machine is not functioning properly, don’t use it. Report any unsafe condition found by using posting on #red- | *'''Machine Maintenance''' - Equipment needs to be properly maintained to function safely. If there is any indication that the machine is not functioning properly, don’t use it. Report any unsafe condition found by using posting on #red-tag-issues on Slack and putting a filled out red-tag and/or lock-out/tag-out device on the equipment to prevent its use until it is repaired. | ||
*'''Fire and Explosion''' - Woodworking facilities contain large quantities of fuel in the form of woods, wood products, and sawdust, (and also paints, oils finishes, solvents, and other flammable liquids). Sawdust can ignite and burn far more easily than whole pieces of lumber. Regular maintenance must be done to ensure that dust is not accumulating in the area. | *'''Fire and Explosion''' - Woodworking facilities contain large quantities of fuel in the form of woods, wood products, and sawdust, (and also paints, oils finishes, solvents, and other flammable liquids). Sawdust can ignite and burn far more easily than whole pieces of lumber. Regular maintenance must be done to ensure that dust is not accumulating in the area. | ||
*Electrical panels must be kept clear. | *Electrical panels must be kept clear. | ||
*Fire extinguishers and exit routes must always be accessible. | *Fire extinguishers, first aid kits, eye washes stations, and exit routes must always be accessible. | ||
* It is important for every user to ensure that they perform effective clean-ups of the equipment and the area to reduce the build up of wood dust, the separation of flammable materials, the proper maintenance of equipment. | *It is important for every user to ensure that they perform effective clean-ups of the equipment and the area to reduce the build up of wood dust, the separation of flammable materials, the proper maintenance of equipment. | ||
====Reporting Issues==== | ====Reporting Issues==== | ||
| Line 85: | Line 88: | ||
'''Equipment Issues''' | '''Equipment Issues''' | ||
'''Red-Tag Equipment''' – If equipment needs repairs, place a red-tag on it and report it via the Pikes Peak Makerspace Slack, #red- | '''Red-Tag Equipment''' – If equipment needs repairs, place a red-tag on it and report it via the Pikes Peak Makerspace Slack, #red-tag-issues channel. This advises others on the malfunctioning equipment and ensures that actions can be taken to service/repair the equipment. | ||
=====Red Tags===== | =====Red Tags===== | ||
:'''•''' Any damage to tools or broken equipment MUST be reported in a direct message to an Area Deputy or our Director. | :'''•''' Any damage to tools or broken equipment MUST be reported in a direct message to an Area Deputy or our Director. | ||
:'''•''' Use a '''[[New Member Orientation#Red Tags|Red Tag]]''' to designate the broken equipment. | :'''•''' Use a '''[[New Member Orientation#Red Tags|Red Tag]]''' to designate the broken equipment. | ||
:'''•''' Additionally, report the issue in our Slack #red- | :'''•''' Additionally, report the issue in our Slack #red-tag-issues channel. | ||
====Equipment Information==== | ====Equipment Information==== | ||
| Line 96: | Line 99: | ||
=====Laminated Placards===== | =====Laminated Placards===== | ||
* There are laminated placards with detailed equipment information hanging on each of the large Wood Shop power equipment. These can also be found in the PPM Wiki under Wood Shop- Training ("PPM Jointer Safety and Operations", for example) | *There are laminated placards with detailed equipment information hanging on each of the large Wood Shop power equipment. These can also be found in the PPM Wiki under Wood Shop- Training ("PPM Jointer Safety and Operations", for example) | ||
*More detailed information can be found on the PPM Wiki/Wood Shop page. Vendor supplied Operation, Instruction, and parts lists can be found as links on that page. Most equipment manuals have specific information on capabilities, maintenance, adjustments, and parts lists. Use the specific equipment manual for setup, changing blades, auxiliary attachments, alignments, and general maintenance. | *More detailed information can be found on the PPM Wiki/Wood Shop page. Vendor supplied Operation, Instruction, and parts lists can be found as links on that page. Most equipment manuals have specific information on capabilities, maintenance, adjustments, and parts lists. Use the specific equipment manual for setup, changing blades, auxiliary attachments, alignments, and general maintenance. | ||
| Line 137: | Line 140: | ||
It is important to research all materials before cutting and take precautions to ensure there are no harmful fumes released and no chips blocking the tool's functionality or the dust collection ability. | It is important to research all materials before cutting and take precautions to ensure there are no harmful fumes released and no chips blocking the tool's functionality or the dust collection ability. | ||
===== Paint or Solvents===== | =====Paint or Solvents===== | ||
Do not apply Paints or Solvents in the Wood Shop. There are too many combustible materials and the odor is bothersome. | Do not apply Paints or Solvents in the Wood Shop. There are too many combustible materials and the odor is bothersome. | ||
| Line 155: | Line 158: | ||
'''Woodworking projects tend to have 3 parts:''' | '''Woodworking projects tend to have 3 parts:''' | ||
:'''“Plan it. Build it. Clean up after it.”''' | :'''“Plan it. Build it. Clean up after it.”''' | ||
::☐ Clean up the area and equipment that you used. | |||
::☐ All equipment should be ready for the next member to use right away. | |||
::☐ Return all hand tools to their proper location after use. If you don't know where it goes, ask an Area Deputy. This rule applies to all areas of our Makerspace. | |||
::☐ Go to the '''Cleaning Sequence''' sheets hanging on the Wood Shop door: | |||
====='''Cleaning Sequence (Required)'''===== | |||
=====Cleaning Sequence (Required)===== | |||
To ensure that the deep cleaning of the space is maintained, all members are required to do a cleaning task from the sequence flip chart. | To ensure that the deep cleaning of the space is maintained, all members are required to do a cleaning task from the sequence flip chart. | ||
| Line 170: | Line 169: | ||
==Classes== | ==Classes== | ||
'''Woodshop Orientation & SawStop Certification:''' | |||
:: | : A combo class designed for new-to-woodshop members is offered twice per month on Saturday mornings. | ||
:{{Template:Classes}} | |||
==PPM Training== | ==PPM Training== | ||
:If you need help with a tool or technique, use the #wood-shop channel on Slack. | :If you need help with a tool or technique, use the #wood-shop channel on Slack. | ||
:'''[[Woodworking terminology]]''' | :'''[[Woodworking terminology]]''' | ||
:[[Introduction to | :[[Introduction to Woodworking|'''Introduction to Woodworking''']] | ||
==Tips== | ==Tips== | ||
'''Links to external sites:''' | '''Links to external sites:''' | ||
:'''[https://powermatic.com/manuals POWERMATIC MANUALS]''' | :'''[https://powermatic.com/manuals POWERMATIC MANUALS]''' — on powermatic.com | ||
:'''[https://www.woodcraft.com/blogs/wood/toxic-woods.. Toxic Woods]''' — on WOODCRAFT.com | |||
:'''[https://www. | |||
==Equipment Lists== | ==Equipment Lists== | ||
| Line 192: | Line 192: | ||
| style="vertical-align:middle;" |Picture | | style="vertical-align:middle;" |Picture | ||
|Item | |Item | ||
|Model Number | |||
| Model Number | |||
|Power<br>Requirements | |Power<br>Requirements | ||
|Resources | |Resources | ||
| Line 200: | Line 199: | ||
|<br>'''Woodturning Lathe,''' | |<br>'''Woodturning Lathe,''' | ||
'''18" extension, swing away tail stock,<br>ONEWAY bowl chuck'''<br> | '''18" extension, swing away tail stock,<br>ONEWAY bowl chuck'''<br> | ||
[[File:Level 3 badge.png|alt=Level 3 badge|left|frameless| | [[File:Level 3 badge.png|alt=Level 3 badge|left|frameless|45x45px|link=https://wiki.pikespeakmakerspace.org/index.php/File:Level_3_badge.png]]<br> | ||
|POWERMATIC<br>3520B | |||
|POWERMATIC 3520B | |||
|Single Phase, | |Single Phase, | ||
220V, 60Hz, 6.2A | 220V, 60Hz, 6.2A | ||
|[https://s3.amazonaws.com/jpw-assets/1/b/8/2/1b82ad72ffa4bfbe3be47b5c32268210eaf6b0b9_1352001_man_en.pdf '''Operating Instructions and Parts Manual'''] | |[https://s3.amazonaws.com/jpw-assets/1/b/8/2/1b82ad72ffa4bfbe3be47b5c32268210eaf6b0b9_1352001_man_en.pdf '''Operating Instructions<br>and Parts Manual'''] | ||
|- | |- | ||
|[[File:POWERMATIC bandsaw big.jpg|alt=PWBS-14 POWERMATIC bandsaw|center|frameless|150x150px]] | |[[File:POWERMATIC bandsaw big.jpg|alt=PWBS-14 POWERMATIC bandsaw|center|frameless|150x150px]] | ||
|'''14" Woodworking Band Saw,''' | |'''14" Woodworking Band Saw,''' | ||
'''rip and cross-cut fences, <br>5" riser'''<br> | '''rip and cross-cut fences, <br>5" riser'''<br> | ||
[[File:Level 3 badge.png|alt=Level 3 badge|left|frameless| | [[File:Level 3 badge.png|alt=Level 3 badge|left|frameless|45x45px|link=https://wiki.pikespeakmakerspace.org/index.php/File:Level_3_badge.png]] | ||
|POWERMATIC<br>PWBS‑14 | |||
|POWERMATIC PWBS‑14 | |||
|Single Phase, | |Single Phase, | ||
115V, 60Hz, 11A | 115V, 60Hz, 11A | ||
|'''[https://s3.amazonaws.com/jpw-assets/7/5/7/b/757bf184f70226a8e2aa6c502c51c213b78ecac4_1791216k_man_en.pdf Operating Instructions and Parts Manual]''' | |'''[https://s3.amazonaws.com/jpw-assets/7/5/7/b/757bf184f70226a8e2aa6c502c51c213b78ecac4_1791216k_man_en.pdf Operating Instructions<br>and Parts Manual]''' | ||
|- | |- | ||
|[[File:POWERMATIC planer.jpg|alt=15HH POWERMATIC planer|center|frameless|150x150px]] | |[[File:POWERMATIC planer.jpg|alt=15HH POWERMATIC planer|center|frameless|150x150px]] | ||
| Line 221: | Line 218: | ||
|'''15-inch Planer,''' | |'''15-inch Planer,''' | ||
'''4" Dust Port'''<br> | '''4" Dust Port'''<br> | ||
[[File:Level 3 badge.png|alt=Level 3 badge|left|frameless| | [[File:Level 3 badge.png|alt=Level 3 badge|left|frameless|45x45px|link=https://wiki.pikespeakmakerspace.org/index.php/File:Level_3_badge.png]] | ||
|POWERMATIC<br>15HH | |||
|POWERMATIC 15HH | |||
|Single Phase, | |Single Phase, | ||
230V, 60Hz, 15A | 230V, 60Hz, 15A | ||
|'''[https://s3.amazonaws.com/jpw-assets/e/5/6/7/e5672c0ae446a5b84cf56a662cc41763b8c40945_1791213_man_en.pdf Operating Instructions and Parts Manual]''' | |'''[https://s3.amazonaws.com/jpw-assets/e/5/6/7/e5672c0ae446a5b84cf56a662cc41763b8c40945_1791213_man_en.pdf Operating Instructions<br>and Parts Manual]''' | ||
|- | |- | ||
| | | | ||
| | | | ||
| Line 237: | Line 232: | ||
| | | | ||
|'''6" Belt/<br>12" Disc<br>Combination Sander'''<br> | |'''6" Belt/<br>12" Disc<br>Combination Sander'''<br> | ||
[[File:Level 3 badge.png|alt=Level 3 badge|left|frameless| | [[File:Level 3 badge.png|alt=Level 3 badge|left|frameless|45x45px|link=https://wiki.pikespeakmakerspace.org/index.php/File:Level_3_badge.png]] | ||
|POWERMATIC<br>30B | |||
|POWERMATIC 30B | |||
|3-phase | |3-phase | ||
|[https://www.ereplacementparts.com/powermatic-30b-combination-belt-and-disc-sander-parts-c-32549_32557_289690.html '''Replacement Parts'''] | |[https://www.ereplacementparts.com/powermatic-30b-combination-belt-and-disc-sander-parts-c-32549_32557_289690.html '''Replacement Parts'''] | ||
|- style="font-weight:bold; text-align:left; font-family:Arial, Helvetica, sans-serif !important; color:#000000;" | |- style="font-weight:bold; text-align:left; font-family:Arial, Helvetica, sans-serif !important; color:#000000;" | ||
| style="vertical-align:middle;" | | | style="vertical-align:middle;" | | ||
| | | | ||
| | | | ||
| Line 252: | Line 245: | ||
<gallery widths="200" heights="125"> | <gallery widths="200" heights="125"> | ||
File:Lathe chuck.jpg | File:Lathe chuck.jpg|'''Lathe chuck''' | ||
</gallery> | </gallery> | ||
===Sharpening and Sanding Equipment List=== | ===Sharpening and Sanding Equipment List === | ||
{| class="wikitable" | {| class="wikitable" | ||
|- style="font-weight:bold; text-align:left; font-family:Arial, Helvetica, sans-serif !important; background-color:#3DA942; color:#ffffff;" | |- style="font-weight:bold; text-align:left; font-family:Arial, Helvetica, sans-serif !important; background-color:#3DA942; color:#ffffff;" | ||
| style="vertical-align:middle;" |Picture | | style="vertical-align:middle;" |Picture | ||
|Item | |Item | ||
|Manufacturer | |Manufacturer | ||
|Model Number | |Model Number | ||
|- | |- | ||
|[[File:Grinder station.jpg|alt=Grinder station|center|frameless|150x150px]] | |[[File:Grinder station.jpg|alt=Grinder station|center|frameless|150x150px]] | ||
|'''8" bench grinder, blue and white grinding stones,<br>Wolverine and Veritas sharpening devices,<br>buffing wheel and compounds''' | |'''8" bench grinder, blue and white grinding stones,<br>Wolverine and Veritas sharpening devices,<br>buffing wheel and compounds''' | ||
|JET | |JET | ||
JWBG‑8 | |JWBG‑8 | ||
|- | |- | ||
|[[File:Granite block.jpg|alt=Granite block|center|frameless|133x133px]] | |||
|'''precision ground granite block, 12"x18"x3"''' | |||
| | | | ||
| | | | ||
|- | |- | ||
| Line 289: | Line 270: | ||
| | | | ||
| | | | ||
|- | |||
| | | | ||
|'''variable speed buffer<br>and buffing wheels''' | |||
|DeWALT | |||
|DWP849 | |||
|- | |- | ||
| | | | ||
|'''sanding belts, disks''' | |||
'''and sheets''' | |||
|3M | |||
| | | | ||
|- style="font-weight:bold; text-align:left; font-family:Arial, Helvetica, sans-serif !important; color:#000000;" | |- style="font-weight:bold; text-align:left; font-family:Arial, Helvetica, sans-serif !important; color:#000000;" | ||
| style="vertical-align:middle;" | | | style="vertical-align:middle;" | | ||
| | | | ||
| | | | ||
| Line 306: | Line 290: | ||
:'''Do not store tools, or anything, on our granite block to avoid damage to its surface.''' | :'''Do not store tools, or anything, on our granite block to avoid damage to its surface.''' | ||
===Wood Shop Equipment List=== | ===Wood Shop Equipment List === | ||
{| class="wikitable" | {| class="wikitable" | ||
|- style="font-weight:bold; text-align:left; font-family:Arial, Helvetica, sans-serif !important; background-color:#3DA942; color:#ffffff;" | |- style="font-weight:bold; text-align:left; font-family:Arial, Helvetica, sans-serif !important; background-color:#3DA942; color:#ffffff;" | ||
| style="vertical-align:middle;" |Picture | | style="vertical-align:middle;" |Picture | ||
|Item | |Item | ||
|Manufacturer | |Manufacturer / <br>Model Number | ||
|Power <br> Requirements | |||
|Power<br>Requirements | |||
|- | |- | ||
|[[File:Miter saw with new dust hood.jpg|alt=Miter saw with new dust hood|center|frameless|133x133px]] | |[[File:Miter saw with new dust hood.jpg|alt=Miter saw with new dust hood|center|frameless|133x133px]] | ||
|'''12" Sliding Compound''' | |'''12" Sliding Compound''' | ||
'''Miter Saw | '''Miter Saw'''<br> | ||
[[File:Level 2 badge.png|alt=Level 2 badge|left|frameless|45x45px|link=https://wiki.pikespeakmakerspace.org/index.php/File:Level_2_badge.png]]<br> | |||
|DeWALT DW708 | |DeWALT | ||
DW708 | |||
|single phase, | |single phase, | ||
110 Volts, | 110 Volts, | ||
| Line 340: | Line 310: | ||
60HZ | 60HZ | ||
|- | |- | ||
| | | | ||
|'''<br>''' | |||
'''1-1/2 HP Shaper<br>Polar Bear Series<br>(2014) | |||
<br> | |||
|Grizzly | |||
G1035P | |||
|single phase, | |single phase, | ||
120V / 240V, | |||
12 Amps at 120V, | |||
60HZ | 60HZ | ||
|- | |- | ||
| | |[[File:JET Jointer.jpg|center|frameless|JET Jointer|150x150px]] | ||
|''' | |'''8" Jointer, 2 HP Motor, ''' | ||
| | '''with SHELIX cutting head''' | ||
|JET | |||
JJ-8CS | |||
|single phase, | |single phase, | ||
110 Volts, | 110 Volts, | ||
15 Amps, | |||
60HZ | 60HZ | ||
|- | |- | ||
| | |[[File:WORK SHARP sharpener.jpg|alt=WORK SHARP sharpener|center|frameless|150x150px]] | ||
|''' | |'''wood tool sharpener''' | ||
| | |WORK SHARP | ||
WS3000 | |||
|single phase, | |single phase, | ||
110 Volts, | 110 Volts, | ||
2 Amps, | |||
60HZ | 60HZ | ||
|- | |- | ||
| | |[[File:DELTA Router Table.jpg|alt=DELTA Router Table|center|frameless|150x150px]] | ||
|''' | |'''Router and Shaper''' | ||
| | '''with bits on rolling carts''' | ||
|DELTA | |||
|single phase, | |single phase, | ||
110 Volts, | 110 Volts, | ||
9 Amps, | |||
60HZ | 60HZ | ||
|- | |- | ||
| | | | ||
| | | | ||
| Line 414: | Line 366: | ||
|'''AIR FILTRATION SYSTEM''' | |'''AIR FILTRATION SYSTEM''' | ||
'''with remote''' | '''with remote''' | ||
|BAILEIGH | | BAILEIGH | ||
AFS-2400 | |||
|single phase, | |single phase, | ||
110 Volts, | 110 Volts, | ||
| Line 422: | Line 374: | ||
60HZ | 60HZ | ||
|- | |- | ||
|[[File:Box fan.jpg|alt=Box fan|center|frameless|140x140px|link=https://wiki.pikespeakmakerspace.org/index.php/File:Box_fan.jpg]] | |[[File:Box fan.jpg|alt=Box fan|center|frameless|140x140px|link=https://wiki.pikespeakmakerspace.org/index.php/File:Box_fan.jpg]] | ||
| Line 430: | Line 379: | ||
'''20", 3-speed''' | '''20", 3-speed''' | ||
|LASKO | |LASKO | ||
| | |||
|- | |||
| | |||
| | | | ||
| | | | ||
| Line 438: | Line 390: | ||
|DELTA | |DELTA | ||
| | | | ||
|- style="font-weight:bold; text-align:left; font-family:Arial, Helvetica, sans-serif !important; color:#000000;" | |- style="font-weight:bold; text-align:left; font-family:Arial, Helvetica, sans-serif !important; color:#000000;" | ||
| style="vertical-align:middle;" | | | style="vertical-align:middle;" | | ||
| | | | ||
| | | | ||
| | | | ||
|} | |} | ||
===Power Tools=== | ===Power Tools=== | ||
{| class="wikitable" | {| class="wikitable" | ||
|- style="font-weight:bold; text-align:left; font-family:Arial, Helvetica, sans-serif !important; background-color:#3DA942; color:#ffffff;" | |- style="font-weight:bold; text-align:left; font-family:Arial, Helvetica, sans-serif !important; background-color:#3DA942; color:#ffffff;" | ||
| style="vertical-align:middle;" |Picture | | style="vertical-align:middle;" |Picture | ||
|Item | |Item | ||
|Manufacturer | |Manufacturer / <br>Model Number | ||
| Resources | |||
|Resources | |||
|- | |- | ||
|[[File:Compact Router.jpg|alt=Milwaukee Compact Router|center|frameless|120x120px]] | |[[File:Compact Router.jpg|alt=Milwaukee Compact Router|center|frameless|120x120px]] | ||
|'''COMPACT ROUTER''' | |'''COMPACT ROUTER''' | ||
'''M18 FUEL''' | '''M18 FUEL''' | ||
|Milwaukee | |Milwaukee | ||
2723-20 | 2723-20 | ||
|[https://www.milwaukeetool.com/Products/Power-Tools/Woodworking/Jig-Saws/2723-20 2723-20] | |[https://www.milwaukeetool.com/Products/Power-Tools/Woodworking/Jig-Saws/2723-20 2723-20] | ||
[https://documents.milwaukeetool.com/58-14-2745d4.pdf OPERATOR'S MANUAL] | [https://documents.milwaukeetool.com/58-14-2745d4.pdf OPERATOR'S MANUAL] | ||
|- | |- | ||
|[[File:Makita Circular Saw.jpg|alt=Makita Circular Saw|center|frameless|120x120px]] | |[[File:Makita Circular Saw.jpg|alt=Makita Circular Saw|center|frameless|120x120px]] | ||
|'''Circular Saw,''' | |'''Circular Saw,''' | ||
'''185mm''' | '''185mm''' | ||
|Makita | |Makita | ||
5007NB | 5007NB | ||
|[https://www.makitatools.com/products/details/5007NB 5007NB] | |[https://www.makitatools.com/products/details/5007NB 5007NB] | ||
[https://www.makitatools.com/products/details/5007NB product detail on makita.com] | [https://www.makitatools.com/products/details/5007NB product detail on makita.com] | ||
|- | |- | ||
|[[File:Makita Router 3601B.jpg|alt=Makita Router 3601B|center|frameless|120x120px]] | |[[File:Makita Router 3601B.jpg|alt=Makita Router 3601B|center|frameless|120x120px]] | ||
|'''Router''' | |'''Router''' | ||
|Makita | |Makita | ||
3601B | 3601B | ||
|[https://www.makita.com.sg/wp-content/uploads/2020/08/3601B_Manual.pdf INSTRUCTION MANUAL] | |[https://www.makita.com.sg/wp-content/uploads/2020/08/3601B_Manual.pdf INSTRUCTION MANUAL] | ||
|- | |- | ||
|[[File:DeWALT sawsall.jpg|alt=DeWALT sawsall|center|frameless|120x120px]] | |[[File:DeWALT sawsall.jpg|alt=DeWALT sawsall|center|frameless|120x120px]] | ||
|'''RECIPROCATING SAW''' | |'''RECIPROCATING SAW''' | ||
|DeWALT | |DeWALT | ||
DW304P | DW304P | ||
| | | | ||
|- | |- | ||
|[[File:DeWALT jigsaw.jpg|alt=DeWALT jigsaw|center|frameless|120x120px]] | |[[File:DeWALT jigsaw.jpg|alt=DeWALT jigsaw|center|frameless|120x120px]] | ||
|'''JIG SAW''' | |'''JIG SAW''' | ||
|DeWALT | |DeWALT | ||
DW331 | DW331 | ||
| | | | ||
|- | |- | ||
|[[File:BOSCH jigsaw 1590EVS.jpg|alt=BOSCH jigsaw 1590EVS|center|frameless|120x120px]] | |[[File:BOSCH jigsaw 1590EVS.jpg|alt=BOSCH jigsaw 1590EVS|center|frameless|120x120px]] | ||
|'''Jig Saw''' | |'''Jig Saw''' | ||
|BOSCH | |BOSCH | ||
1590EVS | 1590EVS | ||
| | | | ||
|- | |- | ||
|[[File:AIR NAILER.jpg | |[[File:AIR NAILER.jpg|center|frameless|104x104px|AIR NAILER]] | ||
|'''AIR NAILER/''' | |'''AIR NAILER/''' | ||
'''STAPLER''' | '''STAPLER''' | ||
|CENTRAL PNEUMATIC | |CENTRAL PNEUMATIC | ||
64269 | |||
|[https://www.harborfreight.com/18-gauge-2-in-1-air-nailerstapler-68019.html 64269] | |[https://www.harborfreight.com/18-gauge-2-in-1-air-nailerstapler-68019.html 64269] | ||
|- | |- | ||
|[[File:Biscuit Joiner In Red Case.jpg|alt=Biscuit Joiner In Red Case|center|frameless|150x150px]] | |[[File:Biscuit Joiner In Red Case.jpg|alt=Biscuit Joiner In Red Case|center|frameless|150x150px]] | ||
|'''Biscuit | |<br>'''Biscuit Joiner'''<br><br> | ||
|Craftsman | |Craftsman | ||
|[https://www.sears.com/tools-craftsman-tools/b-1324478419?sortOption=UNITS_HIGH_TO_LOW Craftsman] | |[https://www.sears.com/tools-craftsman-tools/b-1324478419?sortOption=UNITS_HIGH_TO_LOW Craftsman] | ||
|- | |- | ||
| | | | ||
| | | | ||
| | | | ||
| | | | ||
| | |} | ||
| | |||
=== Sanders === | |||
{| class="wikitable" | |||
| | |- style="font-weight:bold; text-align:left; font-family:Arial, Helvetica, sans-serif !important; background-color:#3DA942; color:#ffffff;" | ||
| | | style="vertical-align:middle;" |Picture | ||
| | |Item | ||
|Manufacturer / <br>Model Number | |||
| Resources | |||
|- | |- | ||
|[[File:Sander Mouse.jpg|alt=Sander Mouse|center|frameless|133x133px]] | |[[File:Sander Mouse.jpg|alt=Sander Mouse|center|frameless|133x133px]] | ||
| | | | ||
'''Mouse Sander/Polisher''' | '''Mouse Sander/Polisher''' | ||
|BLACK&DECKER / | |||
|BLACK&DECKER | |||
FMS50 | FMS50 | ||
| | | | ||
|- | |- | ||
| | |[[File:Sander PORTER-CABLE.jpg|alt=Sander PORTER-CABLE|center|frameless|133x133px]] | ||
|'''Orbital Sander''' | |||
|PORTER-CABLE / | |||
Quicksand | |||
| | |||
| | |||
| | |||
|''' | |||
| | |||
| | | | ||
|- style="font-weight:bold; text-align:center; font-family:Arial, Helvetica, sans-serif !important; color:#000000;" | |- style="font-weight:bold; text-align:center; font-family:Arial, Helvetica, sans-serif !important; color:#000000;" | ||
| style="vertical-align:middle;" | | | style="vertical-align:middle;" | | ||
| | | | ||
| | | | ||
| Line 673: | Line 561: | ||
| | | | ||
|<p style="text-align:left;">0</p> | |<p style="text-align:left;">0</p> | ||
|PPM | | PPM | ||
|- | |- | ||
|'''18" Quick Release Bar Clamp''' | |'''18" Quick Release Bar Clamp''' | ||
| Line 679: | Line 567: | ||
| | | | ||
|<p style="text-align:left;">0</p> | |<p style="text-align:left;">0</p> | ||
|PPM | | PPM | ||
|- | |- | ||
|'''24" Quick Release Bar Clamp''' | |'''24" Quick Release Bar Clamp''' | ||
| Line 685: | Line 573: | ||
| | | | ||
|<p style="text-align:left;">2</p> | |<p style="text-align:left;">2</p> | ||
|PPM | | PPM | ||
|- | |- | ||
|'''30" Quick Release Bar Clamp''' | |'''30" Quick Release Bar Clamp''' | ||
| Line 691: | Line 579: | ||
| | | | ||
|<p style="text-align:left;">0</p> | |<p style="text-align:left;">0</p> | ||
|PPM | | PPM | ||
|- | |- | ||
|'''36" Quick Release Bar Clamp''' | |'''36" Quick Release Bar Clamp''' | ||
| Line 697: | Line 585: | ||
|[https://www.harborfreight.com/36-in-aluminum-bar-clamp-60539.html ITEM 60539] | |[https://www.harborfreight.com/36-in-aluminum-bar-clamp-60539.html ITEM 60539] | ||
|<p style="text-align:left;">6</p> | |<p style="text-align:left;">6</p> | ||
|PPM | | PPM | ||
|- | |- | ||
|'''60" Quick Release Bar Clamp''' | |'''60" Quick Release Bar Clamp''' | ||
| Line 709: | Line 597: | ||
|[https://www.harborfreight.com/50-inch-clamp-and-cut-edge-guide-66581.html ITEM 66581] | |[https://www.harborfreight.com/50-inch-clamp-and-cut-edge-guide-66581.html ITEM 66581] | ||
|<p style="text-align:left;">1</p> | |<p style="text-align:left;">1</p> | ||
|PPM | | PPM | ||
|- | |- | ||
|'''6" Ratcheting Bar Clamp''' | |'''6" Ratcheting Bar Clamp''' | ||
| Line 737: | Line 625: | ||
===Hand Tools=== | ===Hand Tools === | ||
{| class="wikitable" | {| class="wikitable" | ||
|- style="font-weight:bold; text-align:left; font-family:Arial, Helvetica, sans-serif !important; background-color:#3DA942; color:#ffffff;" | |- style="font-weight:bold; text-align:left; font-family:Arial, Helvetica, sans-serif !important; background-color:#3DA942; color:#ffffff;" | ||
| Line 744: | Line 632: | ||
|Manufacturer | |Manufacturer | ||
|Owner | |Owner | ||
|- | |- | ||
|[[File:Wood clamp donation.jpg|alt=Wood clamp donation|center|frameless|160x160px]] | |[[File:Wood clamp donation.jpg|alt=Wood clamp donation|center|frameless|160x160px]] | ||
| Line 769: | Line 646: | ||
|'''Forstner bit set''' | |'''Forstner bit set''' | ||
'''(16 bits)''' | '''(16 bits)''' | ||
| | |||
|PPM | |||
|- | |||
| | |||
| | |||
| | |||
| | |||
|- | |||
| | |||
|'''Dead Blow Hammer ''' | |||
| | | | ||
|PPM | |PPM | ||
| Line 778: | Line 665: | ||
|} | |} | ||
: | |||
:☐ Return all tools to their proper location after use. This rule applies to all areas of our Makerspace. | |||
==Benefits== | ==Benefits== | ||
| Line 786: | Line 673: | ||
==Donate for Materials and Consumables== | ==Donate for Materials and Consumables== | ||
Donated materials are available for member use, but should be compensated for by making a donation through | Donated materials are available for member use, but should be compensated for by making a donation through the Optix app. | ||
==Additional Help== | |||
Use the PPM Slack channel #wood-shop | |||
Note that we have a Slack channel (#job-board) for members to post, discuss, or accept job opportunities either within PPM or from the community. | |||
{{Template:Footer}} | {{Template:Footer}} | ||
< | <hr style="height:2.5px; background:#3DA942;"> | ||
Latest revision as of 17:52, 25 August 2026
All Wood Shop users are required to follow all Wood Shop Policies and Safety Procedures.
Links to related PPM Wiki pages:

The Wood Shop Area at Pikes Peak Makerspace (PPM) consists of both Level 2 and Level 3 equipment.
Additional PPM training and then PPM certification is required to use any of our Level 3 equipment.
Our trainers are passionate about sharing their knowledge and ensuring a positive learning experience for all.
We are grateful for their commitment and dedication to our community.
Contact Us if you cannot find your answer here on our Wiki or if you notice any outdated information.
Wood Shop Policy, Safety, and Orientation
All Wood Shop users are required to follow all Wood Shop Policies and Safety Procedures.
Members are required to pass the Wood Shop Safety Quiz with 90% or better before attending the in-person orientation.
Emergency Safety - Review the Wood Shop layout to know the nearest emergency exits, eye wash, first aid kits, fire extinguishers, and breaker box in case of emergency.
- By using Pikes Peak Makerspace (PPM) you are agreeing to the shop policies and to operate equipment and use the space safely. Personal safety is your responsibility.
- Damage to tools, equipment, the shop itself caused by your actions is solely your responsibility.
Impairment - The use of the Wood Shop equipment requires you to be alert, attentive and focused.
- Do not use the Wood Shop, any PPM work area, or any PPM tools, if you are under the influence of drugs or alcohol.
- Likewise, ensure that you are well-rested and alert.
Personal Protective Equipment (PPE)
- Safety Glasses - Safety glasses are required when you are operating hand or stationary powered tools in the Wood Shop.
- Additionally, safety glasses are required if you are in the Wood Shop, and someone else is operating powered tools. (ANSI Z87.1-impact resistant) safety glasses are required. These are rated for impact protection and have side shields to provide protection from objects coming from the front and sides. Most prescription glasses are not impact resistant or provide side protection. If you use prescription glasses, then put an ANSI Z87-1 goggle over them.
- Hearing Protection - Hearing protection is required when you are operating stationary powered tools, or someone else is operating machinery in the Wood Shop.
- There are two types of hearing protection available at PPM:
- Soft foam earplugs. To get the best protection roll the foam with your fingers to condense the plug. Pull the top of your ear up and back with the opposite hand, and insert the plug into your ear canal. Hold the plug with your finger for 20-30 seconds to let the plug expand and fill your ear canal. Your voice will sound muffled if the plug has a good seal.
- Ear muffs. These fit over both ears and have sound attenuating material and soft ear cushion to fit around the ears.
- Respiratory Protection - Particulate filter respirator should be used when significant wood dust is being generated (when emptying the dust collector).
- Shoes - Closed toe shoes are required. If working with heavy lumber, consider safety shoes (steel or composite) to protect your toes if materials or tools are dropped.
- Gloves - Gloves should not be worn when using powered equipment (saws, jointers, drills, or other equipment). Leather gloves can be worn for handling materials, but not when operating machinery.
- Hair and Clothing - There are many moving parts in the Wood Shop that can get caught and pull you into mechanical equipment. Tie back long hair when operating machinery. Also ensure that sleeves, hoodie strings, and any loose clothing is secured.
- Jewelry - Remove rings, bracelets and any other jewelry that could get caught when operating equipment.
Hazards
The following are a list of hazards that should be considered while working in the Wood Shop.
- Wood Dust - Exposure to wood dust has been associated with a variety of adverse health effects including dermatitis, respiratory effects and cancers. Engineering controls include local exhaust ventilation which removes dust at or near the source. To be effective the dust collection system needs to be maintained. Check and clean the dust collection system to ensure they are working properly. Additionally, particulate filters, or respirators can be worn to protect personnel directly.
- Noise - The machinery in the Wood Shop can exceed 85 decibels in noise. This can impair hearing if you are exposed to it over a sustained amount of time. Noise levels can be reduced by maintaining motors and moving parts in top operating conditions, reducing the speed of operation, ensuring the equipment frames are rigid and isolating noisy equipment on rubber footing. Additionally, hearing protection (ear muffs, and ear plugs) can be used to reduce individual exposure to loud noises while working in this area.
- Electrical Hazards - To minimize the danger of electrical hazards, machines must always be grounded, circuit breakers and fuse boxes labeled, cords, cables and plugs must be in good repair, and outlets and switches must be covered. Report any unsafe condition found by using posting on #red-tag-issues on Slack and putting a filled out red-tag on the equipment to prevent its use until it is repaired.
- Machine Maintenance - Equipment needs to be properly maintained to function safely. If there is any indication that the machine is not functioning properly, don’t use it. Report any unsafe condition found by using posting on #red-tag-issues on Slack and putting a filled out red-tag and/or lock-out/tag-out device on the equipment to prevent its use until it is repaired.
- Fire and Explosion - Woodworking facilities contain large quantities of fuel in the form of woods, wood products, and sawdust, (and also paints, oils finishes, solvents, and other flammable liquids). Sawdust can ignite and burn far more easily than whole pieces of lumber. Regular maintenance must be done to ensure that dust is not accumulating in the area.
- Electrical panels must be kept clear.
- Fire extinguishers, first aid kits, eye washes stations, and exit routes must always be accessible.
- It is important for every user to ensure that they perform effective clean-ups of the equipment and the area to reduce the build up of wood dust, the separation of flammable materials, the proper maintenance of equipment.
Reporting Issues
Injuries
If there is a personal injury requiring medical attention, dial 911 and obtain medical treatment.
Report any accidents or personal safety issues (including near-misses) as soon as possible with one of these methods:
- Call 719-445-MAKE(6253) and leave a detailed message including:
☐ Your name and phone number
☐ Who was injured and their phone number
☐ Describe the injury, part of body
☐ Detail what type of medical attention was sought
☐ Describe how the accident occurred
☐ Include the equipment that was being used
- Send a direct message to our Executive Director on Slack
- Use the form on the PPM website to Contact Us
- Include all the same information listed in the checklist above
Equipment Issues
Red-Tag Equipment – If equipment needs repairs, place a red-tag on it and report it via the Pikes Peak Makerspace Slack, #red-tag-issues channel. This advises others on the malfunctioning equipment and ensures that actions can be taken to service/repair the equipment.
Red Tags
- • Any damage to tools or broken equipment MUST be reported in a direct message to an Area Deputy or our Director.
- • Use a Red Tag to designate the broken equipment.
- • Additionally, report the issue in our Slack #red-tag-issues channel.
Equipment Information
- Be knowledgeable about the equipment that you are using.
Laminated Placards
- There are laminated placards with detailed equipment information hanging on each of the large Wood Shop power equipment. These can also be found in the PPM Wiki under Wood Shop- Training ("PPM Jointer Safety and Operations", for example)
- More detailed information can be found on the PPM Wiki/Wood Shop page. Vendor supplied Operation, Instruction, and parts lists can be found as links on that page. Most equipment manuals have specific information on capabilities, maintenance, adjustments, and parts lists. Use the specific equipment manual for setup, changing blades, auxiliary attachments, alignments, and general maintenance.
Getting Help
- Use the #wood-shop channel on Slack to get help with specific equipment.
- Utilize tutorial videos on-line that provide general information on many of the Wood Shop tools, techniques, and safeguards.
Dust Collection and Air Handler
Woodworking creates wood chips, dust and fine dust. There are three reasons for dust collection.
- Fine particulate matter is a health hazard that can be a respiratory irritant in the near-term, and a more serious health condition with long-term exposure.
- Fire Danger – A Wood Shop without dust collection has combustible dust everywhere, floors, tools, light fixtures, machinery housing, furnaces, and electrical boxes. Dust increases the chance for a fire start or acceleration if in contact with heaters, hot fixtures, machine housings, and other sources.
- Annoyance – True craftsmen work to precision high quality standards. Chips and dust can impact accuracy, joinery, final finishes, and the quality of the final product. Dust in machinery means more maintenance is needed. Plus, people prefer to work in clean environments.
Reclaimed Materials Usage
Use Metal Detector
Scan the Wood for Metal - Use a hand-held metal detector wand on all reclaimed wood stock. It will locate remaining screws, nails and other metal parts. Any identified metal needs to be removed prior to cutting or shaping on woodworking equipment.
Upcycled Wood
Don’t bring any wood that has lead paint, bugs, or toxic materials to PPM Wood Shop. Paint must be removed prior to bringing to PPM for any up-cycled lumber project. Many pallets are treated with toxic pesticides, such as methyl bromide. Additionally, there can be residuals of toxic chemicals left on pallets, or bacteria from food shipments.
Here are some resources about reclaimed wood:
https://earth911.com/health/how-to-safely-use-pallet-wood/
https://rockinwoodusa.com/is-reclaimed-wood-safe/
Recycling wood has ecological and aesthetic value. But, only if it is not exposing you and PPM members to hazardous materials.
Acceptable Materials
The equipment in the Wood Shop is configured with blades and bits for working with the following materials:
- Solid wood
- Plywood
- MDF (Medium Density Fiberboard)
- Upcycled/recycled wood (see caution on use above)
Banned Materials
- Metals
- Composite decking material ("Trex", for example - requires a special blade and will quickly dull standard woodworking blades)
Plastics & Resin
It is important to research all materials before cutting and take precautions to ensure there are no harmful fumes released and no chips blocking the tool's functionality or the dust collection ability.
Paint or Solvents
Do not apply Paints or Solvents in the Wood Shop. There are too many combustible materials and the odor is bothersome.
- Use the ventilated room, outdoors, or other location for applying paints or solvent-based finishes.
Check-in/ Check-out form
All woodshop users are required to use the Check-in/ Check-out form when using the shop areas.
Project Storage
Project storage is extremely limited and therefore must be carefully managed. Keep your project out of the way, and do not leave it unattended for multiple days or it is subject to removal.
All projects left in the woodshop must be labeled with green Project Storage tags.
Clean-up
If you do not have time to clean up, you do not have time to build it.
Woodworking projects tend to have 3 parts:
- “Plan it. Build it. Clean up after it.”
- ☐ Clean up the area and equipment that you used.
- ☐ All equipment should be ready for the next member to use right away.
- ☐ Return all hand tools to their proper location after use. If you don't know where it goes, ask an Area Deputy. This rule applies to all areas of our Makerspace.
- ☐ Go to the Cleaning Sequence sheets hanging on the Wood Shop door:
Cleaning Sequence (Required)
To ensure that the deep cleaning of the space is maintained, all members are required to do a cleaning task from the sequence flip chart.
If you have comments about the cleaning sequence, leave a note on the Check-out form.
Classes
Woodshop Orientation & SawStop Certification:
- A combo class designed for new-to-woodshop members is offered twice per month on Saturday mornings.
PPM Training
- If you need help with a tool or technique, use the #wood-shop channel on Slack.
- Woodworking terminology
- Introduction to Woodworking
Tips
Links to external sites:
- POWERMATIC MANUALS — on powermatic.com
- Toxic Woods — on WOODCRAFT.com
Equipment Lists
POWERMATIC Equipment List
| Picture | Item | Model Number | Power Requirements |
Resources |
 |
Woodturning Lathe, 18" extension, swing away tail stock,  |
POWERMATIC 3520B |
Single Phase,
220V, 60Hz, 6.2A |
Operating Instructions and Parts Manual |
 |
14" Woodworking Band Saw,
rip and cross-cut fences, |
POWERMATIC PWBS‑14 |
Single Phase,
115V, 60Hz, 11A |
Operating Instructions and Parts Manual |
 |
15-inch Planer,
4" Dust Port |
POWERMATIC 15HH |
Single Phase,
230V, 60Hz, 15A |
Operating Instructions and Parts Manual |
| 6" Belt/ 12" Disc Combination Sander |
POWERMATIC 30B |
3-phase | Replacement Parts | |
-
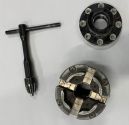 Lathe chuck

Sharpening and Sanding Equipment List
| Picture | Item | Manufacturer | Model Number |
 |
8" bench grinder, blue and white grinding stones, Wolverine and Veritas sharpening devices, buffing wheel and compounds |
JET | JWBG‑8 |
 |
precision ground granite block, 12"x18"x3" | ||
| variable speed buffer and buffing wheels |
DeWALT | DWP849 | |
| sanding belts, disks
and sheets |
3M | ||
- Do not store tools, or anything, on our granite block to avoid damage to its surface.
Wood Shop Equipment List
| Picture | Item | Manufacturer / Model Number |
Power Requirements |
 |
12" Sliding Compound
Miter Saw  |
DeWALT
DW708 |
single phase,
110 Volts, 13 Amps, 60HZ |
1-1/2 HP Shaper |
Grizzly
G1035P |
single phase,
120V / 240V, 12 Amps at 120V, 60HZ | |
 |
8" Jointer, 2 HP Motor,
with SHELIX cutting head |
JET
JJ-8CS |
single phase,
110 Volts, 15 Amps, 60HZ |
 |
wood tool sharpener | WORK SHARP
WS3000 |
single phase,
110 Volts, 2 Amps, 60HZ |
 |
Router and Shaper
with bits on rolling carts |
DELTA | single phase,
110 Volts, 9 Amps, 60HZ |
 |
AIR FILTRATION SYSTEM
with remote |
BAILEIGH
AFS-2400 |
single phase,
110 Volts, 14 Amps, 60HZ |
 |
Box fan,
20", 3-speed |
LASKO | |
| Dust Collector 1.5HP 6" inlet |
DELTA | ||
Power Tools
| Picture | Item | Manufacturer / Model Number |
Resources |
 |
COMPACT ROUTER
M18 FUEL |
Milwaukee
2723-20 |
2723-20 |
 |
Circular Saw,
185mm |
Makita
5007NB |
5007NB |
 |
Router | Makita
3601B |
INSTRUCTION MANUAL |
 |
RECIPROCATING SAW | DeWALT
DW304P |
|
 |
JIG SAW | DeWALT
DW331 |
|
 |
Jig Saw | BOSCH
1590EVS |
|
 |
AIR NAILER/
STAPLER |
CENTRAL PNEUMATIC
64269 |
64269 |
 |
Biscuit Joiner |
Craftsman | Craftsman |
Sanders
| Picture | Item | Manufacturer / Model Number |
Resources |
 |
Mouse Sander/Polisher |
BLACK&DECKER /
FMS50 |
|
 |
Orbital Sander | PORTER-CABLE /
Quicksand |
|
Clamps
| Item | Manufacturer | Model | Quantity | Owner |
| 6" Wooden Handscrew Clamps | ROCKLER | Wooden Handscrew Clamps | 2 |
PPM |
| 8" Quick Clamp | Irwin | Irwin
Quick Grip |
2 |
PPM |
| 12" Quick Clamp | Irwin | Irwin
Quick Grip |
2 |
PPM |
| 36" Quick Clamp | Irwin | Irwin
Quick Grip |
1 |
Bill Epperson |
| 30" Pipe Bar Clamp | Bessey | BESSEY Tools North America | 4 |
Bill Epperson |
| 48" Pipe Bar Clamp | Bessey | BESSEY Tools North America | 2 |
Bill Epperson |
| 60" Pipe Bar Clamp | Bessey | BESSEY Tools North America | 2 |
Bill Epperson |
| 36" Quick Release Steel Bar Clamp | Jorgensen | CABINET MASTER 8036 | 5 |
PPM |
| 6" Quick Release Bar Clamp | 2 |
Bill Epperson | ||
| 12" Quick Release Bar Clamp | 0 |
PPM | ||
| 18" Quick Release Bar Clamp | 0 |
PPM | ||
| 24" Quick Release Bar Clamp | 2 |
PPM | ||
| 30" Quick Release Bar Clamp | 0 |
PPM | ||
| 36" Quick Release Bar Clamp | ITEM 60539 | 6 |
PPM | |
| 60" Quick Release Bar Clamp | ITEM 60673 | 2 |
PPM | |
| 50" CLAMP & CUT EDGE GUIDE | ITEM 66581 | 1 |
PPM | |
| 6" Ratcheting Bar Clamp | 0 |
PPM | ||
| 12" Ratcheting Bar Clamp | 6 |
PPM | ||
| 24" Ratcheting Bar Clamp | 0 |
PPM | ||
Hand Tools
| Picture | Item | Manufacturer | Owner |
 |
Wood Clamps | PPM | |
 |
10 Million Dollar Stick | PPM | |
 |
Forstner bit set
(16 bits) |
PPM | |
| Dead Blow Hammer | PPM | ||
- ☐ Return all tools to their proper location after use. This rule applies to all areas of our Makerspace.
Benefits
- PPM members enjoy discounts at the following local merchants:
- (bring proof of PPM membership)
| Website | Benefit | Address |
|---|---|---|
| Woodcraft of Colorado Springs | 10% discount | 4438 Austin Bluffs Parkway |
| CO Lumber Specialties | 10% discount | 3636 Stone Avenue |
| GENERAL AIR | 10% discount | 3031 N Nevada Ave. |
| ACE Hardware Uintah Gardens | 10% discount | 1830 W Uintah Street |
Donate for Materials and Consumables
Donated materials are available for member use, but should be compensated for by making a donation through the Optix app.
Additional Help
Use the PPM Slack channel #wood-shop
Note that we have a Slack channel (#job-board) for members to post, discuss, or accept job opportunities either within PPM or from the community.
Search the PPM Wiki — include Content pages as well as Multimedia.
Contact Us if you cannot find your answer here on our Wiki or if you notice any outdated information.